What Is an Easy Install Floor Drain?

Time:2026-10-27 Author:Ethan
0%

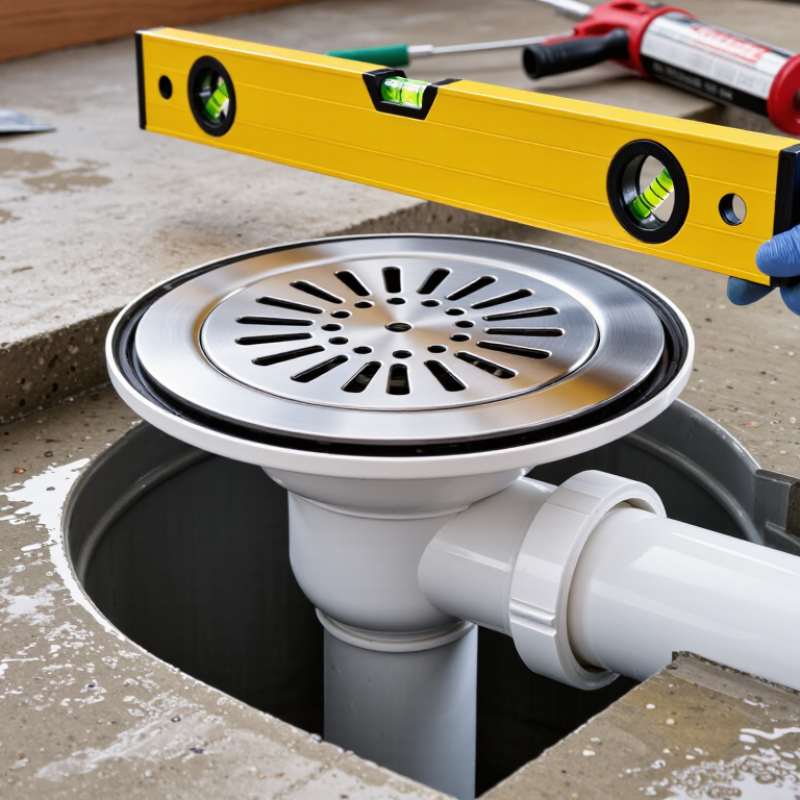
An Easy Install Floor Drain is designed for faster placement, simpler alignment, and fewer adjustments during construction or renovation. Its value appears on the jobsite: a contractor checks the pipe position, sets the drain body, seals the connection, and tests the slope before the floor finish is installed. Small errors still matter. Poor leveling can leave water around a grate, even when the drain looks professionally fitted.

Market reports place this product within a wider plumbing-fixtures industry shaped by remodeling, maintenance, and water-management demand. Allied Market Research projected the global plumbing-fixtures market to reach about $133 billion by 2030, while The Freedonia Group identifies repair and replacement work as important demand drivers in the United States. These figures do not measure floor drains alone, so they should not be treated as direct sales data. That distinction is often missed.

Tile-industry educator John Bridge has repeatedly emphasized a practical principle: “The drain is the heart of the shower.” His point applies beyond showers. Drain position affects waterproofing, cleaning, odor control, and long-term floor performance. A well-designed Easy Install Floor Drain may reduce labor, but it cannot correct a damaged substrate or an incorrect waste-line gradient. Check the manufacturer’s instructions and applicable plumbing standards. Use compatible seals. Test before closing the floor.

The result is practical, not perfect. Installation becomes easier, yet careful measurement still decides whether the finished surface stays dry, clean, and dependable.
What Is an Easy Install Floor Drain?

Definition and Core Purpose of an Easy Install Floor Drain

What Is an Easy Install Floor Drain?

An easy install floor drain is a drainage fitting designed for faster, simpler placement in a floor. It collects surface water and directs it into a connected waste pipe. Its core purpose is basic but important: control water before it spreads, pools, or damages nearby surfaces.

Unlike a traditional drain, this type may include an adjustable body, removable grate, sealing ring, or connection system that reduces cutting and alignment work. During installation, the drain must sit level with the finished floor. Even a small height error can leave water around the grate. A properly fitted seal also helps prevent leaks, odors, and unwanted moisture below the floor.

It is not a magic shortcut.

The phrase “easy install” can be misleading. The drain may be simple to position, but the surrounding slope still requires care. In practical work, installers often test the area with a small amount of water before closing the floor. This reveals slow drainage, poor grading, or a weak seal early. The floor material, pipe size, and local plumbing requirements must also match the drain’s design. A convenient fitting cannot correct an unsuitable pipe layout. Careful measurement remains essential, even when the product appears straightforward.

Key Components and How the Drainage System Works

What Is an Easy Install Floor Drain?

An easy install floor drain uses a simple, adjustable assembly for faster placement and reliable water removal. Its key components include a grate, drain body, strainer, trap, waterproofing flange, and outlet pipe. The grate catches hair and debris, while the trap holds a small water seal against sewer gases. The flange connects the drain to the waterproofing layer, which is critical in bathrooms, utility rooms, and wet areas.

The system works mainly through gravity. Water falls through the grate, passes the trap, and flows into the waste pipe. A properly sloped floor guides water toward the drain; common plumbing practice targets about 2% slope, or 20 millimeters per meter. The International Code Council’s plumbing provisions also emphasize trapped drainage connections and accessible cleanouts. These details reduce odors and simplify maintenance. Still, “easy install” does not mean careless install.

The U.S. Environmental Protection Agency estimates that household leaks can waste nearly 1 trillion gallons of water annually. A floor drain cannot solve every leak, but it can limit standing water damage when installed correctly. ASPE plumbing guidance stresses trap protection, suitable venting, and service access. On site, a frequent mistake is setting the grate too low. Water then collects around its edges. I have found that checking the slope with a straightedge is faster than correcting tile later. It is not glamorous. It prevents expensive rework.

What Is an Easy Install Floor Drain?

Key components and how the drainage system works

An easy-install floor drain typically includes a drain grate, removable strainer, drain body, waterproofing connection, trap, and horizontal waste pipe. Water passes through the grate and strainer, flows into the drain body, is blocked from sewer gases by the trap, and then moves through the sloped waste pipe.

The chart shows typical minimum slopes for horizontal drainage pipes. Smaller pipes commonly use a 1/4-inch-per-foot slope, while 3- to 6-inch pipes commonly use a 1/8-inch-per-foot slope. Always confirm requirements with local plumbing regulations.

Common Types and Suitable Installation Locations

What Is an Easy Install Floor Drain?

An easy install floor drain is designed to reduce cutting, fitting, and adjustment during placement. However, “easy” does not mean careless. The floor still needs correct drainage, stable support, and reliable waterproofing. A small level error can leave water beside the grate instead of over it.

Point drains are common in bathrooms, utility rooms, balconies, and small laundry areas. They collect water at one central opening, so the surrounding floor should slope from several directions. They suit compact spaces but may require more precise tile cutting.

Linear drains use a long channel along a wall or shower entrance. They work well in walk-in showers and larger wet rooms. A single-plane slope is often easier to form than four angled slopes. Yet the channel must be aligned carefully, or water may gather at one end.

Channel drains with removable grates are useful near garage doors, patios, workshops, and outdoor steps. They handle runoff across wider entrances. Choose a model with suitable load resistance and a cleanable trap. Debris builds up quickly outdoors.

A practical installation check includes the drain height, floor slope, waterproof membrane, and pipe connection. Keep the grate accessible for cleaning. Do not bury it under permanent flooring. Local plumbing requirements may also control trap depth and discharge arrangements.

Easy installation is partly about preparation. Measure twice. Still, plans can change after the subfloor is opened. That is where careful adjustment matters most.

Step-by-Step Installation Process and Required Tools

An easy-install floor drain uses a preformed drain body, removable grate, and compatible trap connection. It suits bathrooms, laundry rooms, utility spaces, and small renovations. Check the finished floor height before buying the drain. A few millimeters can affect the final slope.

Mark the drain location and confirm the pipe route below. Cut the opening carefully, then dry-fit the drain body and trap. Use a tape measure, marker, level, drill, hole saw, adjustable wrench, pipe cutter, primer, sealant, and waterproofing materials. Connect the outlet pipe with clean, square cuts. Keep the drain grate level with the finished surface. The surrounding floor should slope gently toward it, without creating a sharp dip. I still recheck this slope twice. Rushed measurements are easy to regret.

Apply the recommended seal around the drain flange and protect the joint during flooring work. Test the connection with several liters of water before closing the floor. Watch for seepage underneath, not only around the grate. The U.S. Environmental Protection Agency estimates household leaks waste nearly one trillion gallons of water annually nationwide. That figure makes small drainage failures worth taking seriously. Professional plumbing guidance also stresses accessible traps and cleanouts, yet compact installations often leave too little service space. That is a common oversight. Leave enough room to remove the grate, clear debris, and inspect the trap without damaging finished surfaces.

What Is an Easy Install Floor Drain? - Step-by-Step Installation Process and Required Tools

Step Installation Task Required Tools Materials or Components Typical Time Completion Check
1 Confirm the drain location, pipe size, floor thickness, and finished floor height before starting. Tape measure, marker, flashlight, level Floor drain assembly and compatible drain pipe or outlet 10–15 minutes The outlet is accessible and the drain can be positioned at the lowest point of the floor.
2 Remove the existing grate or drain body and clean debris, sealant, and loose material from the opening. Screwdriver, utility knife, pliers, scraper, brush, vacuum Cleaning cloth and approved surface cleaner 15–30 minutes The opening is clean, dry, and free from cracks or loose fragments.
3 Dry-fit the drain body, gasket, flange, and grate without applying sealant. Tape measure, level, adjustable wrench Drain body, rubber gasket, locking nut or compression ring, grate 10–15 minutes Parts fit together correctly, and the grate will finish flush or slightly below the surrounding floor.
4 Apply the specified sealant or plumber’s putty to the sealing surface, following the drain manufacturer’s instructions. Caulking gun, putty knife, disposable gloves Compatible sanitary sealant or plumber’s putty 5–10 minutes The sealant forms a continuous ring without gaps or excessive buildup.
5 Insert the drain body into the opening and install the gasket, washer, or compression ring from the accessible side. Adjustable wrench, strap wrench, screwdriver Gasket, washer, compression ring, and locking nut 10–20 minutes The gasket is seated evenly and is not twisted, pinched, or visibly displaced.
6 Tighten the locking nut or compression connection gradually. Do not overtighten plastic components. Adjustable wrench, torque wrench if specified Drain connection hardware 5–10 minutes The drain is stable, centered, and sealed without cracked fittings or distorted gaskets.
7 Install the grate or strainer and verify that its surface is level with the finished floor. Screwdriver, level, measuring tape Grate or strainer and adjustment ring, if supplied 5–10 minutes The grate is secure, unobstructed, and does not create a trip hazard.
8 Test the drain with clean water and inspect every joint for leaks. Bucket, cup, flashlight, dry paper towel Clean water 10–15 minutes Water flows freely, no joint remains damp, and there is no standing water around the drain.
9 Remove excess sealant and allow the sealant to cure before exposing the connection to regular use. Plastic scraper, damp cloth, utility knife Additional sealant only if a visible gap is found Curing time varies The finished area is clean, and the sealant has cured according to its instructions.
Important: An easy-install floor drain is generally designed to simplify replacement or installation where an existing, accessible drain outlet is already available. New drain lines, concrete cutting, waterproofing work, or changes to a building’s plumbing system may require additional materials, permits, and a qualified plumbing professional.

Maintenance, Benefits, and Important Safety Considerations

What Is an Easy Install Floor Drain?

An easy install floor drain is designed for faster fitting during renovation or repair work. It usually includes an adjustable body, removable grate, and a simple connection to the waste line. Some models fit existing openings, reducing concrete cutting and installation time. On site, the real advantage is access. A removable grate lets workers clear hair, sediment, and standing water without dismantling the floor.

Maintenance still matters. Flush the drain regularly and inspect the trap for drying or blockage. A dry trap can allow unpleasant sewer gases into the room. The U.S. Environmental Protection Agency reports that household leaks can waste nearly 10,000 gallons of water yearly. A slow drain may not look serious, but it can hide a leaking or damaged connection. I have seen “easy” installations become difficult when the floor slope was measured poorly. That part is easy to underestimate.

Safety deserves equal attention.

The Centers for Disease Control and Prevention identifies falls as a major source of serious injury, so the grate must sit level and resist movement. Choose a load rating that matches foot traffic, carts, or equipment. Keep wet areas clearly marked during cleaning. Never mix drain chemicals, and wear gloves and eye protection. The Occupational Safety and Health Administration also stresses slip prevention through housekeeping and prompt spill control. An anti-slip surface helps, but it cannot correct poor drainage. Check the seal, grate, and surrounding floor after installation. Small defects become expensive surprises.

FAQS

What is an easy-install floor drain?

It reduces cutting, fitting, and adjustment during installation. The process is simpler, not careless. Proper slope and waterproofing remain essential.

Where do point drains work best?

Point drains suit bathrooms, balconies, utility rooms, and small laundry areas. Water flows toward one central opening. The floor should slope from several directions.

When is a linear drain a better choice?

Linear drains suit walk-in showers and larger wet rooms. They usually need one broad slope. That can simplify tile shaping. Alignment still matters.

Where are channel drains commonly installed?

Channel drains work near garage doors, patios, workshops, and outdoor steps. They collect runoff across wider entrances. Outdoor debris can build up quickly.

What should be checked before installing a floor drain?

Check drain height, floor slope, waterproof membrane, and pipe connections. Keep the grate accessible. Do not cover it permanently. Measure twice.

How can an easy-install floor drain be maintained?

Flush it regularly and remove hair, sediment, and standing water. Inspect the trap for blockages. A dry trap may allow unpleasant gases indoors. Small warning signs matter.

How can a floor drain improve safety?

The grate should sit level and resist movement. Choose a load rating for people, carts, or equipment. Clean spills quickly. Wet floors are risky.

What installation problems are easy to underestimate?

A small slope error can leave water beside the grate. Poor alignment may collect water at one end. Plans can change after opening the subfloor. Careful adjustment is still needed.

Conclusion

An Easy Install Floor Drain is a practical drainage solution designed to remove wastewater from bathrooms, utility rooms, kitchens, garages, and other areas where water may collect. It usually includes a drain cover, grate, strainer, body, trap, seals, and connecting pipe. Together, these components guide water into the drainage system while helping block odors, debris, and unwanted backflow. Common designs include point drains, linear drains, and shallow models, each suited to different floor layouts and installation conditions.

Installation generally involves marking the drain position, preparing the opening, connecting the outlet pipe, setting the drain body at the correct level, sealing the joints, and testing water flow. Basic tools may include a tape measure, level, saw, wrench, sealant, and protective equipment. Regular cleaning, checking for blockages, and inspecting seals can extend service life. Key benefits include quicker installation, improved floor drainage, and easier maintenance, but proper slope, secure connections, ventilation, and safe handling of tools remain essential.


Ethan

Ethan

Ethan is a seasoned marketing professional with a deep expertise in our company's innovative product line. With a passion for sharing knowledge and insights, he takes the lead in regularly updating our corporate blog, where he explores industry trends, product features, and effective marketing......